How to Replace Your Water Filter Cartridge Easily
How to Replace Your Water Filter Cartridge — A Stress‑Free Guide
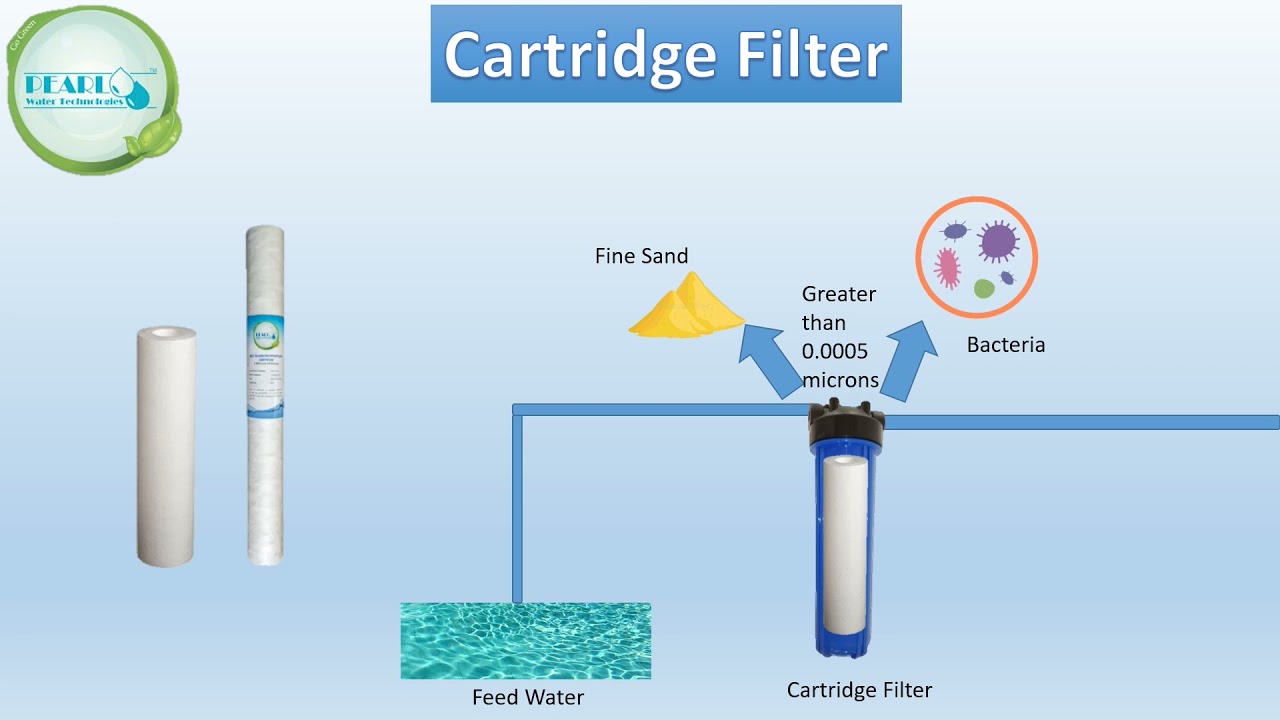
Whether you’re sipping on a cold glass of filtered water after a tough workout or brewing a pot of coffee for the office, a clean water‑filter cartridge is the unsung hero behind that crisp taste. Over time, the cartridge’s media becomes saturated with contaminants, flow slows, and the “fresh‑tasting” vibe fades. Fortunately, swapping out the cartridge is one of the simplest DIY chores you can master—no plumber, no special tools, just a few minutes and a bit of know‑how.
Below is a step‑by‑step, no‑nonsense guide that works for most under‑sink, countertop, and whole‑house filter systems. We’ll also cover the “what‑if’s” (different filter types, troubleshooting, safety), so you can tackle the job confidently and keep your water tasting its best.
1. Why Replace the Cartridge on Schedule?
| Reason | What Happens If You Skip It |
|---|---|
| Reduced Flow | Water drips instead of streams; you’ll waste time waiting for the faucet to fill. |
| Lower Filtration Efficiency | Trapped contaminants can break loose, re‑contaminating your water. |
| Shortened System Life | The housing and seals can wear out faster under constant pressure. |
| Warranty & Certification | Many manufacturers require regular cartridge changes to keep warranties valid. |
Rule of thumb: Most manufacturers recommend a replacement every 2‑6 months, or after a specific volume of filtered water (10 000‑50 000 gal). Check the label on your cartridge for the exact interval.
2. Gather Your Tools (You’ll Need Very Little)
| Item | Why You Need It |
|---|---|
| New cartridge (exact model) | Guarantees proper fit and performance. |
| Bucket or large bowl | Catches any water that spills when you remove the housing. |
| Soft cloth or paper towels | Wipes away drips and helps keep the area tidy. |
| Adjustable wrench or pliers (optional) | For older models with a tightening nut. |
| Gloves (optional) | Keeps your hands clean and protects from sharp edges. |
Pro tip: Keep a spare cartridge on hand. It’s far easier to change a filter when you spot a drop in performance than to scramble for a new one in the middle of a hot summer day.
3. Identify Your Filter Type
Before you start, know which family your unit belongs to. Most residential filters fall into one of three categories:
| Type | Common Brands | Typical Cartridge Shape | Key Characteristics |
|---|---|---|---|
| Pitcher/Dispenser | Brita, PUR | Small, rectangular, snap‑in | No plumbing, just replace the cartridge inside the pitcher. |
| Countertop/Under‑Sink | APEC, iSpring, Aquasana | Cylindrical or donut‑shaped | Usually a twist‑off or quick‑release housing. |
| Whole‑House (point‑of‑entry) | Culligan, 3M, Pentair | Large cylindrical cartridges (up to 15 in) | Located near the main water line; often requires a wrench to loosen the housing. |
If you’re unsure, locate the model number on the housing or in the user manual. A quick Google search of “[brand] + [model] cartridge replacement” will point you to the exact part you need.
4. Step‑by‑Step Cartridge Replacement
Step 1 – Turn Off the Water Supply
- Under‑sink & countertop: Locate the shut‑off valve on the cold‑water line feeding the filter. Turn it clockwise until it stops.
- Whole‑house: Close the main water valve for the entire house (usually found near the water meter).
Step 2 – Relieve Pressure
- Open the faucet downstream of the filter (e.g., kitchen sink) and let the water run for 30‑60 seconds. This empties residual pressure from the line and prevents a spray when you open the housing.
Step 3 – Place a Bucket Under the Filter
- Position the bucket directly beneath the housing to catch any water that will escape when you separate the two halves.
Step 4 – Loosen the Housing
- Quick‑release (push‑button or twist‑lock): Press the release lever, then twist or pull the top off.
- Threaded (nut‑type): Use an adjustable wrench to turn the housing counter‑clockwise. Don’t overtighten the wrench; a snug hand turn is enough.
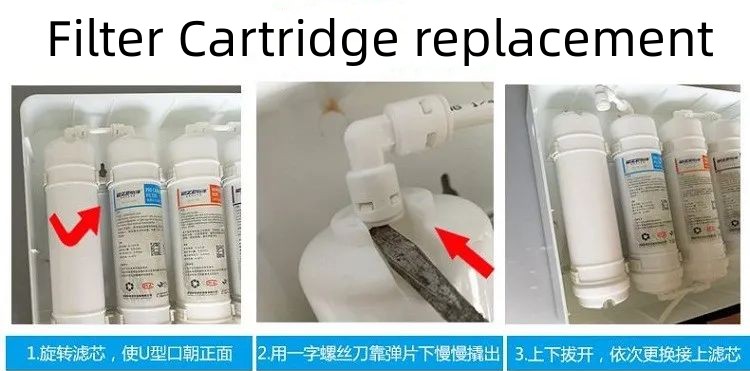
Step 5 – Remove the Old Cartridge
- Most cartridges simply slide out. Some may have a snap‑in tab; gently press the tab while pulling the cartridge upward.
- Important: Note the orientation (arrow or notch) on the cartridge. You’ll need to insert the new one the same way.
Step 6 – Inspect the Housing
- Look for mineral deposits, cracks, or worn O‑rings. Clean the interior with a soft cloth and warm, soapy water if needed. Rinse thoroughly.
- If you see damage: Replace the housing or the O‑ring (often sold separately) to avoid leaks.
Step 7 – Install the New Cartridge
- Remove any protective film from the cartridge’s sealing surface.
- Align the cartridge with the arrow/notch and push it fully in until you feel it click or seat firmly.
- Re‑assemble the housing: twist it back on or snap the top closed.
Step 8 – Restore Water Flow
- Turn the shut‑off valve back on (counter‑clockwise) slowly.
- Open the downstream faucet and let the water run for 2‑3 minutes. This flushes out any loose carbon particles or air trapped in the new filter.
- Check for leaks around the housing. If you spot a dribble, tighten the housing a bit more (or reseat the O‑ring).
Step 9 – Reset the Indicator (If Applicable)
- Many modern filters have a digital or mechanical indicator that tracks usage. Follow the manufacturer’s instructions to reset it—usually a press‑and‑hold of a button for a few seconds.
Step 10 – Celebrate!
- Take a sip of that crystal‑clear water and enjoy the peace of mind that you’ve just extended the life of your filtration system.
5. Helpful Tips & Tricks
- Mark Your Calendar – Add the replacement date to your phone or a wall calendar. Set a reminder a week before the due date.
- Keep the Old Cartridge – Store it in a sealed bag; some manufacturers accept used cartridges for recycling.
- Use a Wet‑Vacuum – If you’re working with a whole‑house system, a wet/dry vacuum can quickly suck up any water that pools inside the housing after you open it.
- Don’t Over‑Tighten – Excessive force can crack plastic housings or strip threads. Hand‑tight is usually sufficient.
- Check for Compatibility – Even within one brand, different models may require slightly different cartridges (e.g., “7‑day” vs. “30‑day” versions). Verify the part number before buying.
6. Common Problems & Quick Fixes
| Symptom | Likely Cause | Fix |
|---|---|---|
| Water drips after replacement | Loose housing or misaligned O‑ring | Tighten housing, reseat O‑ring, ensure cartridge fully seated |
| Slow flow | Clogged pre‑filter screen or sediment buildup in housing | Disassemble housing, clean screen with a soft brush, rinse thoroughly |
| Foul taste | Cartridge expired or wrong type (e.g., only reduces chlorine, not heavy metals) | Install the correct cartridge for your water concerns; replace if overdue |
| Leaking at the valve | Shut‑off valve not fully opened or defective | Fully open valve; if leak persists, replace valve |
| Error code on digital indicator | Reset procedure not completed | Follow manufacturer’s reset steps; if error persists, contact support |
7. When to Call a Professional
While most DIY replacements are straightforward, there are scenarios where a plumber or certified technician should step in:
- Corroded or damaged housing that can’t be resealed.
- Leaking connections after multiple attempts to tighten.
- Complex whole‑house systems with multiple stages (e.g., sediment + carbon + reverse osmosis) where pressure balancing is required.
- Warranty concerns – Some manufacturers require a professional installation for the warranty to remain valid.
8. Bottom Line
Replacing a water filter cartridge is a quick, inexpensive task that pays off in better‑tasting, safer water and a longer‑lasting filtration system. By keeping a few basic tools handy, noting the type of filter you own, and following the simple steps above, you’ll never be caught off‑guard by a sluggish faucet or a funky flavor again.
Pro‑tip recap:
- Know your schedule → Mark the date.
- Have the right part → Check model number.
- Work methodically → Shut off water, relieve pressure, replace, flush.
- Inspect the housing → Clean, replace O‑rings if needed.
Give your filter a fresh start today—your taste buds (and your health) will thank you!